I’ve been updating Kodist, my passion project that takes no-AI photos on an iPhone. I take in Bayer RAW data from the iPhone camera, apply colour profiles, and save it as a photo into the Photo Library — simple, right? That’s until I wanted to support HDR (High Dynamic Range, or EDR for Extended Dynamic Range, if you prefer). The photo up top, taken in Burnaby, BC, is one of the results — captured, edited, and saved through the exact workflow below.
One challenge I had was to save the Bayer RAW photo in an HDR colour space — colours can go beyond typical 1.0 in the SDR range, and the photos look instantly bright and lifelike.
Recap on ISO HDR vs. Adaptive HDR
Shortly put the best I know how:
ISO HDR is the original, simpler approach — you save a single image with HDR values baked directly into every pixel, with no separate SDR companion. It looks great in an app that understands HDR and tone-maps it well, but it’s a gamble everywhere else: an app or OS that doesn’t know what to do with the extra range has to guess how to compress it back down to SDR, and different apps guess differently. The same ISO HDR photo can look correct in one app and blown-out or over-saturated in another.
Adaptive HDR is what Adobe began adopting with Apple to recently follow, and it removes that gamble: instead of one HDR image, you save an SDR image plus a gain map — the mathematical difference between the SDR and HDR versions. An app that only understands SDR just sees the good-looking SDR image and ignores the gain map. An app that understands HDR reconstructs the full-range image on the fly. Either way, the photo is guaranteed to look right, instead of hoping the receiving app guesses correctly.
At the 9:38 mark, this WWDC 2024 video (the year of iOS 18) explains it the best: Use HDR for dynamic image experiences in your app.
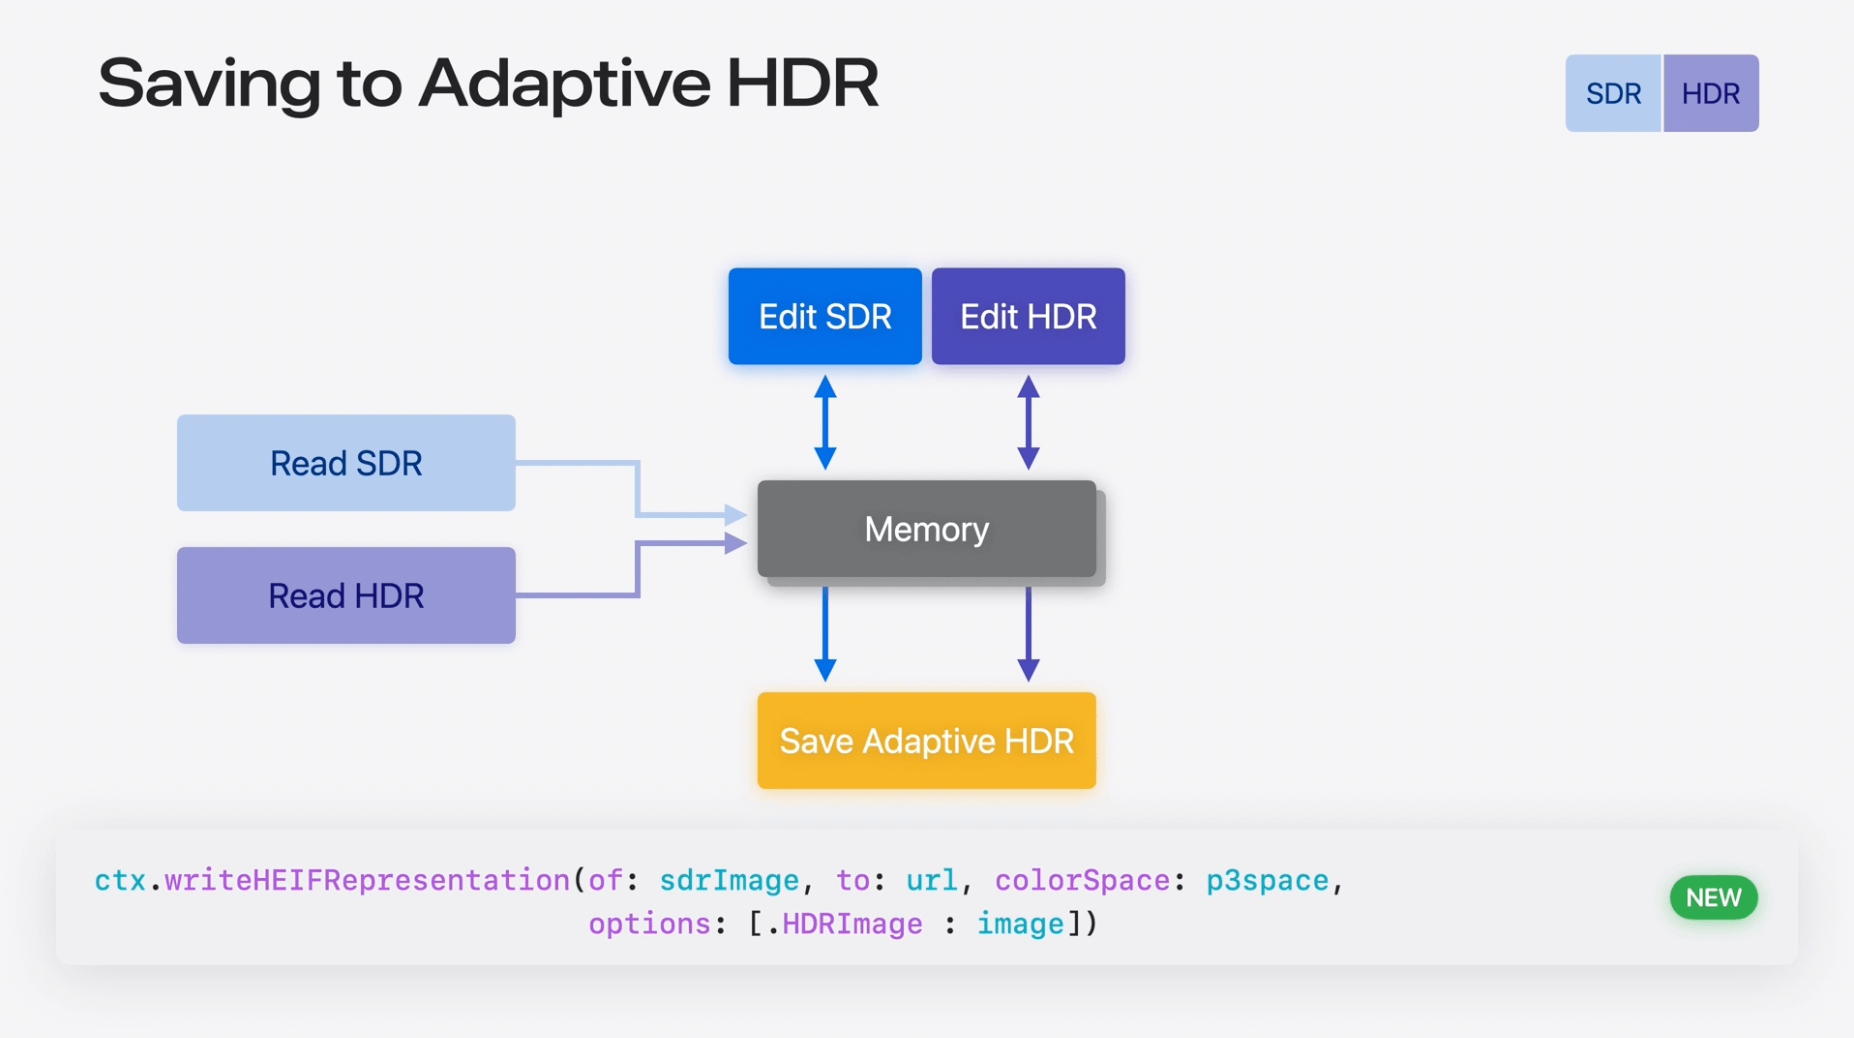
The options for saving Adaptive HDR
In the aforementioned video, at 31:37 mark, Apple Engineer David Hayward explained that there are 3 ways you can edit and save an HDR photo:
- Edit HDR only, and save as a non-adaptive HDR photo
- Edit SDR photo, edit the gain map, and save both as an Adaptive HDR photo
- Edit SDR and HDR photos, and save them as an Adaptive HDR photo
In Kodist, I chose Option 3 because:
- I want the photo to look right everywhere, and Option 1 alone can’t guarantee that — a plain ISO HDR photo has no SDR fallback, so it’s exactly the gamble described above. Option 1 is out.
- My input is Bayer RAW photo data (i.e. not Apple Pro RAW), and a gain map isn’t something readily available from that source. As a result, Option 2 is out.
The complete workflow
You will need 3 components to make Adaptive HDR work:
- The edited image in SDR
- The edited image in HDR
- The correct, SDR colour space (i.e. Display P3, not Display P3-PQ)
I am using CIRAWFilter to get the CIImage from Bayer RAW data. To generate the photo in HDR, you’ll need to tweak some parameters:
let rawFilter = CIRAWFilter(imageData: rawImageData, identifierHint: nil)!
rawFilter.isGamutMappingEnabled = true // Required for tone-mapping
rawFilter.extendedDynamicRangeAmount = 1.0 // Required

let hdrImage = rawFilter.outputImage!
(Note that extendedDynamicRangeAmount can be any float value between 0 and 2 — it’s how far past the SDR white point the output is allowed to go, effectively how much extra headroom you’re asking for. I found that 2 is a bit excessive for my use case; 1 seems best. isGamutMappingEnabled matters once you push that amount above 0: it remaps colours that fall outside the standard colour gamut back into range instead of letting them clip.)
With this HDR image, you can do editing with CIFilter chains for your own purposes. Once you’re settled, you will need to generate the corresponding SDR image:
// import CoreImage.CIFilterBuiltins

let toneMapFilter = CIFilter.toneMapHeadroom()
toneMapFilter.inputImage = hdrImage
toneMapFilter.targetHeadroom = 1

let sdrImage = toneMapFilter.outputImage!
Headroom, in this context, is how much extra brightness range sits above the standard SDR white point — an SDR image has a headroom of 1 (none), while the HDR image above might have a headroom of 2 or more. Setting targetHeadroom = 1 here compresses the HDR image back down to that SDR baseline.
Now you have all 3 components! Time to render the Adaptive HDR photo to disk:
let options: [CIImageRepresentationOption : Any] = [
	.hdrImage: hdrImage, // Pass in HDR image here
]

let p3ColorSpace = CGColorSpace(name: .displayP3)!

let heifData = ciContext.heifRepresentation(
	of: sdrImage,
	format: .RGB10,
	colorSpace: p3ColorSpace,
	options: options)!
If you’re wondering what the key .hdrImage does, you are not alone! This isn’t mentioned in Apple’s developer documentations, but was alluded to in this WWDC session:
- If this key is used, Core Image calculates the per-pixel difference between the HDR and SDR images, and generates a gain map for you.
- The value of this key is a CIImage object in the HDR range.
Remember that the code samples in the video were released during WWDC, the week of iOS 18 beta 1. A few things must have changed including the lower-cased .hdrImage spelling, and that format: is no longer an optional parameter for this image rendering method.
Saving to the Photo Library
Generating heifData gets you the bytes, but you still need to write them into the Photo Library. That takes PHAssetCreationRequest:
import Photos
import UniformTypeIdentifiers

let options = PHAssetResourceCreationOptions()
options.uniformTypeIdentifier = UTType.heic.identifier

PHPhotoLibrary.shared().performChanges {
	let creationRequest = PHAssetCreationRequest.forAsset()
	creationRequest.addResource(with: .photo, data: heifData, options: options)
} completionHandler: { success, error in
	// Handle failure — e.g. the user may have denied write access.
}
Setting uniformTypeIdentifier explicitly matters: without it, PhotoKit has to infer the file type from the raw bytes, and I’ve seen it misidentify the Adaptive HDR HEIF data. Make sure you’ve also requested photo library add access (NSPhotoLibraryAddUsageDescription) before calling this, or performChanges will fail into the error you should be checking in the completion handler.
Putting it all together
If you just want the whole pipeline in one place — raw data in, saved to Photos out:
import CoreImage
import CoreImage.CIFilterBuiltins
import Photos
import UniformTypeIdentifiers

func saveAdaptiveHDRPhoto(rawImageData: Data, ciContext: CIContext) {
	let rawFilter = CIRAWFilter(imageData: rawImageData, identifierHint: nil)!
	rawFilter.isGamutMappingEnabled = true
	rawFilter.extendedDynamicRangeAmount = 1.0
	let hdrImage = rawFilter.outputImage!

	let toneMapFilter = CIFilter.toneMapHeadroom()
	toneMapFilter.inputImage = hdrImage
	toneMapFilter.targetHeadroom = 1
	let sdrImage = toneMapFilter.outputImage!

	let renderOptions: [CIImageRepresentationOption: Any] = [.hdrImage: hdrImage]
	let p3ColorSpace = CGColorSpace(name: .displayP3)!
	guard let heifData = ciContext.heifRepresentation(
		of: sdrImage,
		format: .RGB10,
		colorSpace: p3ColorSpace,
		options: renderOptions
	) else { return }

	let assetOptions = PHAssetResourceCreationOptions()
	assetOptions.uniformTypeIdentifier = UTType.heic.identifier

	PHPhotoLibrary.shared().performChanges {
		let creationRequest = PHAssetCreationRequest.forAsset()
		creationRequest.addResource(with: .photo, data: heifData, options: assetOptions)
	} completionHandler: { success, error in
		// Handle failure — e.g. the user may have denied write access.
	}
}
Why I skipped Image I/O
Apart from Core Image, Apple provides another framework, Image I/O, for lower-level image data and metadata (auxiliary data) handling. While it seemed tempting to try things, I decided that Image I/O remained something for people who want better data control or who look to juice the best performance out of the app.
Further reading
If you are looking, JuniperPhoton has a great discussion and code examples in his Substack. Rio Ogino also has a great 2-part discussion on ISO HDR vs. Adaptive HDR, as well as low-level rendering in Metal.
Related, if you are interested in displaying (not saving) HDR photos, checkout this WWDC 2023 session, Support HDR images in your app. This should have all the things you need in your UI.
Closing thoughts
I hope you found this article helpful and that you’re one step closer to making better HDR photos. There are still many standards surrounding how HDR works, but I think Apple is leaning towards Adaptive HDR with iOS 18. As with anything in the world, you should probably keep learning as everything can change year to year.